Showing posts with label Cryptocurrency. Show all posts

Tuesday, 15 November 2022

Liquidated all my Cryptocurrencies

I liquidated all my crypto from other crypto exchanges* after losing all my crypto in FTX. Overall, I incurred a loss of around 5 thousand SGD after liquidating all. It was a pity as the Ethereum and Bitcoin that I had was bought during 2017/2018 period. But I felt that it was necessary to liquidate all as FTX bankruptcy is akin to Lehman in the crypto environment. I had absolutely no idea which other exchanges had lend to or had assets tied to FTX. Moreover, FTX had showed a fundamental issue which is of concern, crypto exchanges are using customers assets to leverage without any form of safeguard or guidelines.

It has been a good experience learning crypto. I will reassess going back in when interest rates are cut and FTX's bankruptcy has been investigated. So that I know which other exchanges are implicated. In the meantime, if you are still in, do monitor it closely as liquidity outflows have been happening across the exchanges.


*Fortunately, I redeemed all my cryptos in Gemini Earn on 13 Nov and had withdrew all money out to my DBS bank account on 14 Nov. I have also withdrew all my Coinlist money on 14 Nov. 

Tuesday, 18 January 2022

Guide - Depositing USD Funds into FTX.com (Bankrupted)

FTX is undergoing Bankruptcy. Do not deposit. This post is not deleted for KM purpose. 


This post is meant as a step-by-step guide on how you can deposit USD funds in FTX.com. Depositing USD allows you to buy, sell and store cryptocurrencies such as Bitcoin, Ethereum, Matic (Polygon) and even dogecoin. FTX also allows you to lend your USD or cryptocurrencies while you HODL on to them. 

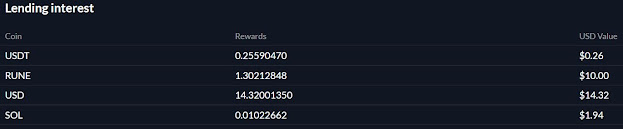
I have earned USD 26.51 interest from lending out USDT, RUNE, USD and SOL. Been using FTX since Sep, after MAS advisory for Binance to stop doing business in Singapore.

I use my DBS (POSB) bank account for depositing USD as there are no fees for same day overseas transfer. 

Let's start with the guide:

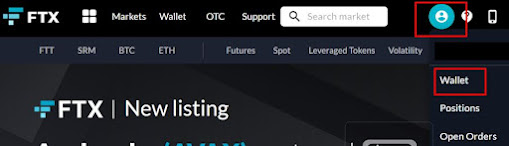
1. Deposit USD funds into FTX. Click the light blue circle icon and then select "Wallet".


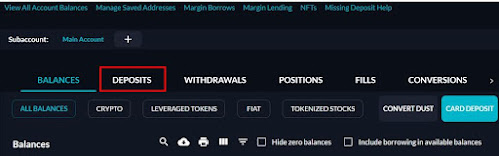
2. Click on "Deposit".


3. Click on "Make a deposit".

4. Click on "Deposit" at the row under USD.       

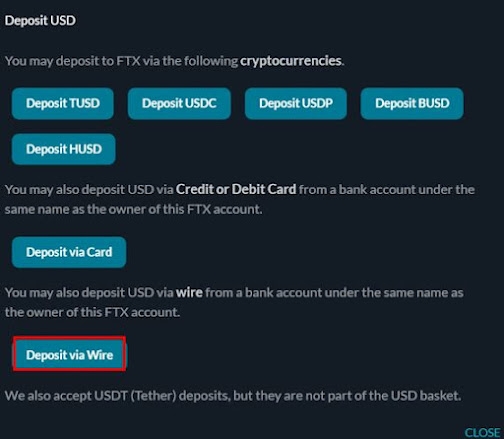
5. Click on "Deposit Via Wire".

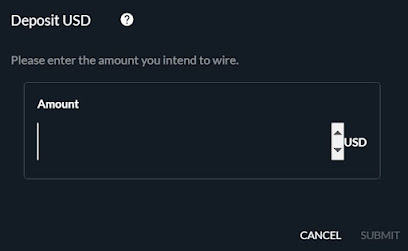
6. Indicate the amount of USD you want to deposit, then click on "Submit".


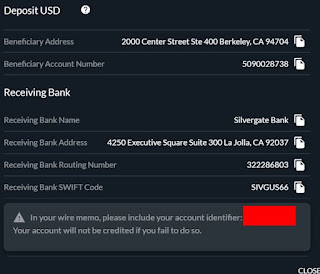
7. The wire instructions will be shown. Take note of your unique account identifier. You need this code for keying into your local bank when doing overseas remit.

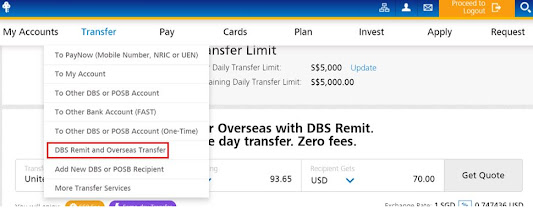
8. Login to your POSB/DBS ibanking account. Select "Transfer" and click on "DBS Remit and Overseas Transfer".

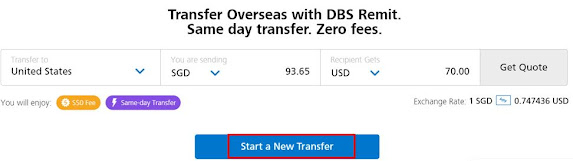
9. Select United States. Key in how much you want to deposit. Then click "Start a new transfer". 

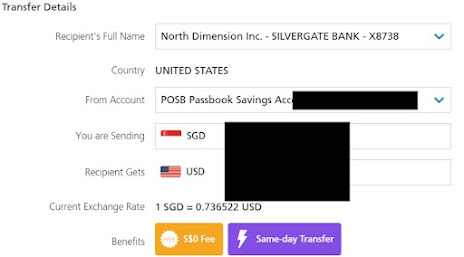
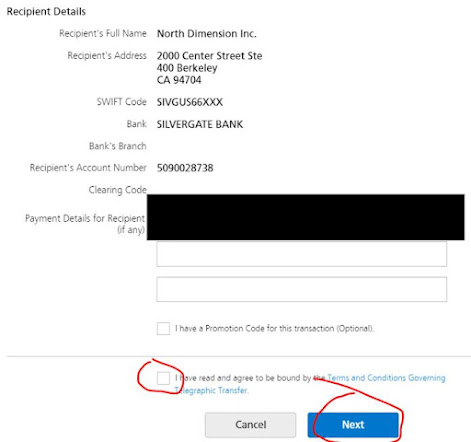
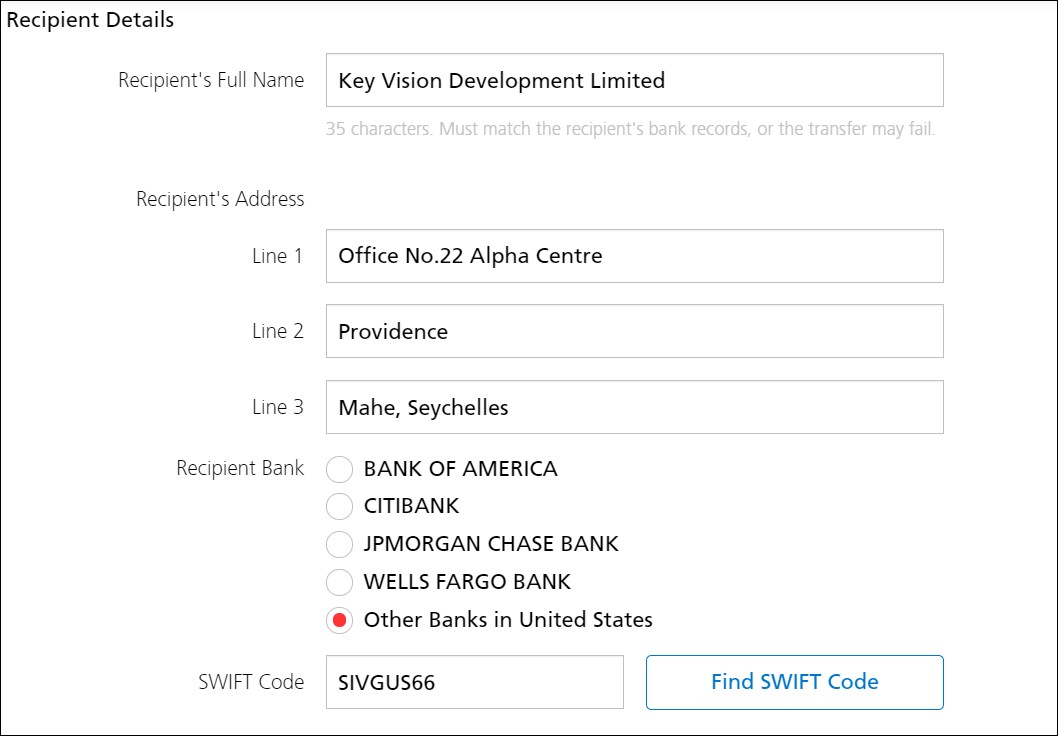
10. Key in the wire instructions details provided by FTX (Step 7). USD amount has to tally with Step 6.


IMPORTANT!! Your unique account identifier has to be keyed into “Payment details for Recipient”. Double check details before clicking next and submit the transaction. You can fill in as per what is in the images above. But do note this is accurate as of Dec 2021. You need to check the instructions given as the details may change.

Do note that you need to use your own bank account with your name that tallies to FTX. You cannot use a joint account as there will be another name tagged to that account which does not tally with FTX's data.

11. Wait for the USD to be deposited into your FTX. DBS typically clear the remit within minutes. Thereafter, processing is handed over to Silvergate and FTX. Deposit will be in FTX in about 1 to 2 working days (USA working timings). During my last deposit, I did the DBS remit at 8pm (SG timing) on Friday and received my funds in FTX at 8.10pm. It is that fast! 

Need a FTX referral link? You can use this link and get 5% discount off your trading fees. 

For other crypto links such as Gemini, Celsius or Blockfi, you can refer to this link.

This is not a buy call for anyone to go into cryptocurrency trading/investment.

Tuesday, 28 September 2021

My First ICO (Braintrust) via Coinlist & Guide to participate in ICO

I have been trying several ICO (initial coin offering) since the 2nd quarter 2021 via Coinlist. Each ICO (e.g. Immutable X, Efinity, Swarm, HUMAN, Vega, Centrifuge) that I participated in, my queue number was so far back that I just logged off.

To illustrate, in most ICOs, only the first 20,000 persons in the queue gets to buy the coin. Most of the queue number that I have had was in the range of 200,000 to even 400,000. If we use the queue number of 200,000, it means that the ICO is at least 1000% oversubscribed. 

For Braintrust, I managed to get a queue number of 3,822 allowing me to buy the coin. I subscribed to the maximum allocation of 500 USDT. My Braintrust (BTRST) are going to be locked up for 3 months from 20 Oct 21. So, I will be deciding whether to keep or sell them in early 2022.

Appended below is a guide on how you can participate in an ICO via Coinlist. 

Step 1: Sign up for a Coinlist account. If you are interested, you can use this referral link. KYC verification is required.

Step 2: Register for that ICO (also known as "Token Sales") by selecting the option you want to participate in before registration date closes.

Step 3: You will need to answer the 8 to 10 questions quiz to proof that you are not a bot and that you have read up briefly about what the ICO is about. Make sure you registration is marked as "Completed". 

Step 4: Take note of when the ICO token sales starts. Typically, it is either at 1am or 7am (SG timing). You will receive an email link to enter into a waiting room. You need to enter into this waiting room before the token sales starts. 

Arriving at the waiting room early does not give you a better place in the queue. You do not need to enter 1 hour before, just 5 minutes before will suffice. When the sale starts, users in the main queue waiting room are assigned a random place in line, ahead of those who arrive after the sale starts.

Step 5:  When the sales starts, you will be able to see your queue number (image below), if your queue number is too big, you can log off and go to sleep (e.g. queue number of 100,000 when only 20,000 can buy. Even if the first 20,000 persons do not buy up to the maximum purchase amount, the 20,001 to 30,000th persons, would probably purchase the balance). 


Step 6: If you are lucky and get a low queue number, wait for your turn. You will have 10 minutes to enter when it is your turn. You will be directed to a page to input the amount you want to purchase.

Step 7: Take note of the (i) payment mode you selected (e.g. USDT, USDC, ETH, BTC) and (ii) payment deposit deadline. If you do not deposit before the period stated, your purchased may be cancelled and you maybe banned from future ICOs. 

Step 8: You need to ensure that your ICO purchase is indicated as "Purchase Complete" with payment received. 


Step 9: Wait for your ICO to be released and you can decide whether to withdraw them to other wallets or sell them. Depending on the ICO mechanism, the coins could be released immediately or locked up for a period of 3 months to a year, or even 2 years. 

Happy ICOing. 

ps: i shifted my coins out of Binance. I setup FTX to replace Binance. My cryptocurrencies are currently in 3 different platforms (Celsius, FTX and Gemini)

Binance Guide: Depositing USD Funds via Bank Transfer into Binance.com

Shifted my coins out of Binance. I setup FTX to replace Binance. My cryptocurrencies are currently in 3 different platforms (Celsius, FTX and Gemini)
This post is meant as a beginner step-by-step guide on how you can deposit USD funds using SGD in Binance. Depositing USD allows you to buy, sell and store cryptocurrencies such as Bitcoin, Ethereum, Matic (Polygon) and even dogecoin. Binance is one of the world biggest bitcoin exchange and altcoin crypto exchange in the world by volume. 

There are 3 methods to fund your Binance account:

      1) Deposit USD via bank transfer (zero fees, same day transfer), using SGD 
      2) Deposit USDT from SGD via P2P
      3) using of credit card

In this guide, I shall touch on the first method. I used my POSB/DBS bank account which does not charge any fees for same day overseas transfer.

If you do not have a Binance.com account you can use my referral link and get 10% commission kickback on your Binance.com trading fees. After you have signed up, you can follow the steps below. To view a clearer image, you can click on the images. 

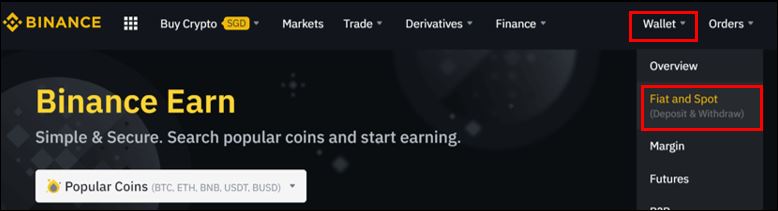
1. Click on your Wallet and select "Fiat and Spot".


2. Click on Deposit. 


3. Select USD for Currency and Select Silvergate Bank (Swift).
Click Continue. 

4. Input amount of USD you want to transfer. It will be deposited as BUSD. Your BUSD can be withdrawn as USD. Click Continue.  

If you do not know about BUSD, read the bottom of this post after step 8.


5. Take note of your unique reference code. This code has to be inputted when making the overseas remit via your local bank. Click Confirm. 

6. Binance payment details including bank account information is shown.


7. To deposit USD funds into Binance
, login to your ibanking . Select "Transfer" and click  on "DBS Remit and overseas transfer". 

7. Scroll down to this image. Select "United States" and indicate the amount of USD you want to deposit into Binance. This amount should be the same as the amount you entered in Step 4. Click "Get Quote". 
The next screen will show that exchange rate, and that you will enjoy zero admin/processing fees and same day transfer. Click "Start a new transfer".

8. Indicate the details as per what you have received in Step 6.


You can fill in as per what is in the images above. But do note this is accurate as of 7 Jun 2021. You still need to check the instructions given in step 6 as the details may change. 

Remember to indicate the unique reference code give to you under "Payment Details for Recipient" (I redacted mine out in black). If this is not indicated correctly, the funds will not be transferred.

Click "Next" and submit the transactions. If you submit the transactions before 5pm on weekdays, the funds will be deposited in your Binance account by 10pm on the same day (if it is not a Public Holiday for SG or USA). If the transaction is submitted after this timing and DBS does not process the transaction, you will need to wait for the next business day. If you do this after 5pm on Fri or weekends, the funds will be deposited on Monday night, provided Monday is not a public holiday in United States.

Sometimes, the funds take longer to be deposited due to an influx of deposits. If you waited more than 4 business days, log a ticket with Binance support. So far, I have not encountered any such issues. 

Once the funds are in Binance, you can make your crypto purchase. 

What is BUSD?
BUSD (Binance USD) is a stablecoin which avoids the extreme volatility of other cryptocurrencies while keeping value within the crypto market. Basically, BUSD can be used to purchase cryptos. 

Need a Binance referral link? You can use this link. For other crypto referral links such as Gemini, Coinlist, Celsius or Blockfi, you can refer to this link.

If you are interested in Cyrpto, you can also read on 

Thursday, 27 May 2021

Depositing USD Funds into Gemini.com

The depositing details for depositing USD into Gemini has changed, hence this is an update to my previous post in 2017. 

This post is meant as a step by step guide on how you can deposit USD funds in Gemini. Depositing USD allows you to buy, sell and store more than 40 cryptocurrencies such as Bitcoin, Ethereum, Matic (Polygon) and even dogecoin. 

I used my POSB (DBS) bank account which does not charge any fees for same day overseas transfer.

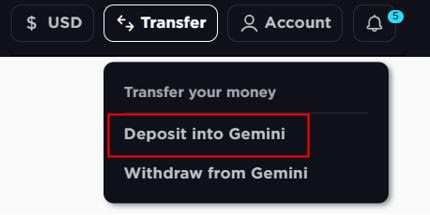
1. Deposit USD funds into Gemini. Select "Transfer" and click on "Deposit into Gemini".


2. Select Currency and Deposit Method. Select "USD" and "Wire Transfer". 
3. Link your bank account. You will see a hyperlink to link your bank account, this must be done for the very first deposit you are making. 

Indicate your account details.  If you are using DBS or POSB bank, the Swift Number is "DBSSSGSG". You can check out other bank's swift number by checking the bank's website.

5. Gemini's deposit instructions will be shown. The details are also sent to your email. 

6. Login to your POSB/DBS ibanking account. Select "Transfer" and click on "DBS Remit and Overseas Transfer".


7. Add Gemini as an Overseas Recipient. Click "New Recipient". 

8. Indicate the amount of SGD you want to transfer in your ibanking. Scroll down, select "United States" and indicate the SGD amount you can to send. Click "Get Quote". 
If you are fine with the amount, click "Start a New Transfer". If you want to adjust the amount, you can change the SGD amount and click "Get Quote" again. 

9. Indicate the details in your ibanking as per what you have received in Step 5.


You can fill in as per what is in the images above. But do note this is accurate as of 25 May 2021. You still need to check the instructions given as the details may change. 

Remember to indicate the unique reference give to you under "Payment Details for Recipient" (I redacted mine out in black). If this is not indicated correctly, the funds will not be transferred.

Click Next and submit the transactions. If you submit the transactions before 5pm on weekdays, the funds will be deposited in your Gemini account by 10pm on the same day. If the transaction is submitted after this timing and DBS does not process the transaction, you will need to wait for the next business day. If you do this after 5pm on Fri or weekends, the funds will be deposited on Monday night, provided Monday is not a public holiday in United States. 

Once the funds are in Gemini, you can make your crypto purchase.

Need a Gemini referral link? You can use this link and get $10 worth of BTC when you trade at least $100 USD within the first 30 days of registration.

For other crypto links such as Binance, Celsius or Blockfi, you can refer to this link. 


This is not a buy call for anyone to go into cryptocurrency trading/investment.

Wednesday, 27 December 2017

Step by step guide to buying Alternative Coins (Altcoins) using Binance

Alternative Coins (also known as Altcoins) are essentially alternative cryptocurrencies to Bitcoin. Some examples are Litecoin (LTC), Zcash (ZEC), Dash, Ripple (XRP), NEO and Verge (XVG). 

I am using Binance* due to the Altcoins which I am interested in. 

Step by step guide to buying Alternative Coins using Binance

1. Register an account with Binance*. You will need to provide your email address and create password.

2. Verify the registration. Log in to your email and find the email sent by Binance and verify the email to completed the registration process. I received the email immediately upon completion of Step 1. If you do not see it, check your spam folder.

3. Complete Two-factor Authentication. Download Google Authenticator app and scan the QR code. Enter the 6 digit code for 2FA and you are logged into Binance. 

4. (Optional) Increase 24h Withdrawal Limit . By default, the 24h Withdrawal Limit is 2 BTC. 


Identity Authentication is required to reach level 2 to increase the 24h Withdrawal Limit to 100 BTC. I actually did the authentication step so that I can share about this here. But as you can see in the screenshot above, I was rejected. The rejection came within 1 calendar day (so efficient) the error states my file number is inconsistent and to resubmit. I resubmitted the documents and got verified within 12 hours! 

For Identity Authentication, you need to provide your (a) Last Nameand (b) First Name, (c) NRIC number, and photos of your (d) passport cover, (e) Passport Personal Page and (f) Selfie with Photo ID And Note stating "Binance" with "date". Once you are done, click "Submit".

5. Deposit BTC (or ETH) into Binance. Select "Funds"" and click "Deposits Withdrawals".

6. Find your Binance's BTC Deposit Address. Find BTC among the list of coins. Click "Deposit" and there will be a drop down which shows your BTC Deposit Address. You can then click on the small icon circled in red (next to "BTC Deposit Address") to copy the address.

7. Enter your Binance's BTC Deposit Address in Gemini (as I use Gemini to buy BTC using USD, I have to withdraw BTC from Gemini). Login to your Gemini account. Select "Transfer Funds", "Withdraw From Exchange" and click "BTC". 
Paste Binance's BTC Deposit Address into the "Desination Address", indicate the amount of BTC you wish to withdraw. Then Click "Review Withdawal". You will need to do 2FA for this transaction to go through. Check and double check that you have indicated the correct deposit address.

Binance will only receive the BTC after 2 network confirmation. Even if you received Gemini's email notification stating that your BTC has been withdrawn successfully, it does not mean that Binance has received it. Based on the 3 deposits I made, it took around half an hour for the BTC to be deposited in Binance. 

Gemini allows 30 free withdrawals per calendar month. Deposits in Binance is free too. 

8. Once your BTC is in you can start buying Altcoins by selecting the Altcoin you want. Binance's trading fee is 0.1%. 

I hope this will be helpful. Steps are accurate as 24 Dec 17. I will not be responsible if Gemini or the banks change any of the procedures or if there are changes in the details to be keyed in. Hence, pl do your own checks too. This is not a buy call for anyone to go into cryptocurrency trading/investment. Also, pl invest only with the amount of money which you can afford to loss. My investment in cryptocurrency is only around 1.5% of my investment portfolio.


Once again, credit goes to Sleepdevil for his patience in teaching me!

*referral link for Binance

Sunday, 24 December 2017

Step by step guide for buying Bitcoin and Ether in Gemini

If you do not know anything about Cryptocurrency (MAS frequently calls it virtual currency in their press statements), I would suggest that you check out MAS' press statements and Sleepdevil's blog as he has a comprehensive explanation about this in this blog and has more than 7 posts on this topic.  I have learnt a great deal on this and also how to purchase Cryptocurrency in Gemini and Binance * from him as he practically taught me everything on a step by step basis. 

Knowing how hard this can be, I have appended below a step by step guide on how you can buy Bitcoin (BTC) and Ether  (ETH) in Gemini. Pl read on only after you know about Cryptocurrency, so that you know what you are signing up for.

Step by step guide for buying Bitcoin and Ether in Gemini

1. Register an account with Gemini. You will need to provide your full name, email address and create password. Do remember to use your full name as it is required for verification and when you do wire transfer, it has to match the name against the name in the bank account which you are using to remit money.

2. Submit documents for verification. For Non-US Applicants, you need to submit proof of your address. It must display your name, residential address and is not dated more than 90 days from the date of submission. Bank account statements are not acceptable. 

Based on my experience in early Dec 17,  I was verified only after 8 calendar days due to a surge in applications. If there is such a surge there is no point writing in to them to chase them as they will not reply. So the least you can do is to ensure that you have submitted the right documents.

3. Transfer funds into your Gemini account. You can only transfer USD funds into the account. Select "Transfer Funds", "Deposit into Exchange and click on "USD (Wire Transfer)". 

4. Provide your bank account details and indicate the amount of USD you want to deposit. I used my POSB (DBS also can) bank account which does not charge any fees for same day overseas transfer.

If you are using DBS or POSB bank, the Swift Number is "DBSSSGSG". (you can check out other bank's swift number by using google search engine.

As for Deposit Amount, indicate the amount of USD you want to transfer.  Thereafter, click "Next". An Instructions Page will appear showing details including the clearing code (known as "Receiving Bank ABA routing number"). The same instructions will be sent to your email.

5. Login to your POSB ibanking account. Select "Transfer" and click on "DBS Remit and Overseas Transfer".

6. Indicate the amount of USD you want to transfer in your ibanking. Select "United States" and the exchange rate is shown. Input the amount of USD you wish to transfer. To prevent delay in depositing USD into your Gemini account, this amount should be the same as what you have indicated in Step 4.

Thereafter click "Start a Transfer".

7. Indicate the details in your ibanking as per what you have received in Step 4.


You can fill in as per what is in the screenshot above. But do note this is only accurate as of 24 Dec 17. You need to check whether the details have changed with each transfer (in late Nov/early Dec, the clearing code was changed to "322286803"". Those who did not notice this and used the old clearing code had to wait for the funds to be refunded to their bank account. This took several business days and when the refund came typically it resulted in a slight loss due to difference in forex rate.). So please be very careful when inputting the details.

Also, pl remember to indicate the unique reference give to you under "Payment Details for Recipient" (circled in red). If this is not indicated correctly, the funds will not be transferred.

8. Sit back and relax. Now the hard part is over. After a short while you will receive an email from POSB/DBS informing you that your request is completed. This does not mean that you have received funds in Gemini. It actually means that your request to transfer the funds have been sent from DBS to the receiving bank.

Do note, in DBS website, it is stated that the cut off time for same day transfer to United States is 8:00AM-5:00PM. You will receive an email notification once your fund has been deposited into Gemini.

My personal experience of the date and time when I received the funds in Gemini after initiating the transfer:
Transferred funds in POSB bank
Receive Funds in Gemini
19-Dec
9:17 PM
21-Dec
3:14 AM
20-Dec
11:41 AM
21-Dec
12:00 AM
21-Dec
10:11 PM
22-Dec
10:49 PM

9. Now you are ready to buy Bitcoin or Ether. Select "Buy" and click either "BTCUSD"or "ETHUSD". Do note there is a 0.25% trading fee for each purchase and sale.


I hope this will be helpful. Steps are accurate as 24 Dec 17. I will not be responsible if Gemini or the banks change any of the procedures or if there are changes in the details to be keyed in. Hence, pl do your own checks too. This is not a buy call for anyone to go into cryptocurrency trading/investment. Also, pl invest only with the amount of money which you can afford to loss. My investment in cryptocurrency is only around 1.5% of my investment portfolio.

Once again, credit goes to Sleepdevil for his patience in teaching me! Thanks Sleepdevil. 

*referral link for Binance